During their training in theatre, nurses meet a new complicated and confusing
work-place
To make operations flow smoothly, It Is useful to use the same movements
as skilled and experienced people.
This chart shows some of the techniques used- there are others. They will
take several weeks to learn. Of course you have lots else to learn --
swab counts, sterile handling, diathermy, suction, etc.
I. BASICS FOR THE INSTRUMENT NURSE
1. KNOW THE OPERATIONTry and study the steps before-hand from a book in the Operating Room (OR) or from your instructor.

(a) Standard instruments. Are they on the trolley? What are their functions and their names?
(b) What disposables are used, such as sties, sutures?
Are they on the trolleys?
(c) What extras may be used, retractors?
Are they handy in the theatre?
Make sure the instruments used are easy to pick out, and in easy reach.
Many OR suites have a standard routine for this.
(a) Remember where they are on the trolley.
(b) Try and anticipate, mentally, rather than physically.
(c) Pass instruments so they can be gripped easily.

Leave basic instruments (scissors, forceps) close to the operater's hand, but keep an eye on the scalpel for safety. (Better passed in a kidney dish for the operator to pick up).
When removing a suture fromthe pack, re-grip it so itdoes not jump free.

Unkink curly tiesby stretching them gently but not by the needle which
may snap off the thread. Don't run your fingers along the strand.
|
Threading a needle: Support the two hands against one another.
|
Loading a needle holder held by another person: Steady your middle finger against the joint of the instrument.
|
Drawing up from a sterile ampoule e.g. x-ray dyes: Here the thumb gives support.
|
5. PLACEMENT OF NEEDLES & TIES
|
The needle Is put near the jaw tips about r/3 of the way from the end. Put it in for a right-handed forward stitch usually.
|
A tie passed in forceps should be put at the tip with about 2 cm.
pointing upwards.
|
 |
(a) Rinse blood off instruments in sterile distilled water during the operation. Don't let blood set and clog up joints. (b) Put out bad instruments for repair. (c) Don't pile up Instruments in heaps. This will damage delicate ones. |
7. ASSISTING
 |
Don't over-help. Remember you are the assistant and not the operator. Make movements slow rather than quick. Avoid irritating body language (circling with the index finger to look for an instrument) and chatter. Try to anticipate: Watch what the surgeon is doing. |
This may be by the hand, by tissue forceps, or special retractors.
|
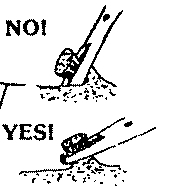
What matters most is often what happens at the tip of the retractor. You may need to push down as well as pull away. Concentration is needed so as not to shift the position of the retractor.
|
Moderate tension is often useful at right angles to the line of the incision to make cutting and dissection easier.
|
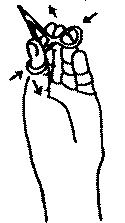
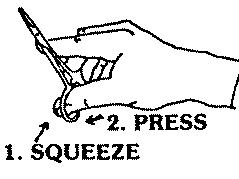
| How to remove these is difficult to put into words. You should practise with a spare, old instrument, outside the operating theatre, using each hand at different angles. | Hold forceps to "show the points". Release there slowly to avoid jumping off the tissue, causing the ligature to slip. | |
 |
 |
 |
Remember that some tissue (e.g. near a badly inflamed appendix) can tear very easily.
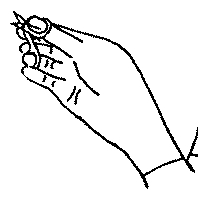
| Hold with the thumb and ring finger, and steady along the handle with the index finger. | Use your other hand or the patient's body to steady your hand. Bent and curved scissors can be steadied on their angle. |
 |
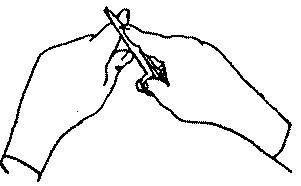 |
Cut near the points of the scissors. Practice with scissors and thread outside the theatre. Try using loose scissors in the left hand for practice.
11. FOLLOWING AND CUTTING SUTURES
| More tension is needed when suturing fascia than bowel. Leave enough length for the surgeon to stitch with. Keep the suture out of the way, and stop it looping and snagging on other instruments. (These are sometimes covered with a pack to stop them catching). |
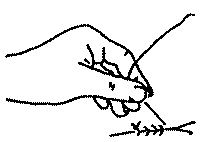
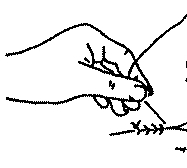
Cutting only one thread: If you are cutting only one thread, leave it long enough not to allow the knot to unravel. |
 |
 |
Dab with gauze - don't wipe, as it starts fresh bleeding. Learn to anticipate from the surgeon's hand language and his rhythm. For example, artery forceps are often used in twos, followed by scissors, to give a kind of waltz rhythm. If sudden heavy bleeding occurs, the surgeon will decide on placement of packs, and preparation of retraction, sucker, and forceps.
Asking questions: Most surgeons enjoy teaching, but pick a time when some difficult step isn't being carried out.
As your experience increases, your movements will become more deft, and your mental anticipation will improve.
You will develop the skills which give you great satisfaction and fulfilment as a member of a team doing a vital job.
You will also learn the importance of pre-operative patient care and preparation in the ward, and the role of the scout or circulating nurse.
All members of the team are involved in the total care of the patient.
-o0o-I. Basics for the instrument nurse
1. Know the operation
2. Passing instruments
3. Ties (ligatures) & sutures
4. Steady your hands
5. Placement of needles & ties
6. Cherish your instruments
II. Basics for the assistant
7. Assisting
8. Retraction of tissue
9. Artery forceps ("clips")
10. Using scissors
11. Following and cutting sutures
12. Other points
HELPING HANDS AT SURGERY
FROM A WALL CHART FOR OPERATING THEATRE TRAINING
I. .Basics for the Instrument Nurse: parts 1 - 6
II. Basics for the Assistant: parts 7 - 12
Originally produced at the Whyalla Hospital, South Australta, by Tracy Cooke, Diane Hannernann, Carol McSorley, and Michael Patkin. Illustrations by Michael Patkin and cartoons by Stephen Stanley.© 1982 Michael Patkin
DAVIS & GECK NURSE EDUCATION SERVICE 88 Christie Street, St. Leonards NSW 2065. Phone (02) 43 0395
-o0o-


