Instruments for microsurgery should suit the operator as well as his task. Their design and selection can be based logically on a study of the human operator, his capacities and his limitations. This kind of approach has been used widely in industry and the aerospace program in the last 20 years. In the selection and care of microsurgical instruments, the handgrip and instruments design and the more mechanical aspects of instruments and material are considered as they relate to the tissue being operated on and influence the work of the human operator.
In earliest human existence, hand made tools would have been used primarily by their maker. As craft technology grew during recorded history, the making of instruments became a specialised activity of individual craftsmen, who maintained a direct personal relation with their client. In modern complex society, there is no direct relation between the user and the manufacturer, and where the design of new specialised equipment is not based on both engineering and ergonomic aspects of the work to be done, its suitability becomes a matter of luck.
In analysing work, such as microsurgery (or many manual activities in
industry for that matter), it is useful to consider two interfaces
(fig. 1).
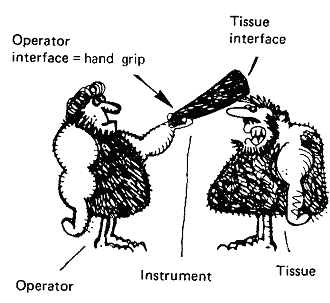
Fig. 1. Interfaces between operator, instrument and tissue.
The first interface is between the operator and their working tools. The second
interface is that between the tools and the material being worked. Often
there is a third interface to be considered, that between mechanical components
in the instrument system which will affect the rest of the task, such
as the relation between a screwdriver and the slot in an orthopaedic screw
where lack of secure fit makes a simple mechanical task difficult, the
use of special applying forceps to hold and open microvascular clamps,
or the security of grip of a needle within a needleholder.
As a guide for this discussion, microsurgery may be defined as the practice of surgery on a scale of minuteness beyond normal unaided human capacities for detailed vision and manipulation. The three main interfaces to be considered are those of grip of instruments by the hand, the resistance of tissues to deformity and penetration, and relations already cited between instruments and materials. However, some attention must also be given to a fourth set of factors, the working environment, in particular some aspects of lighting and colour affecting visual perception.
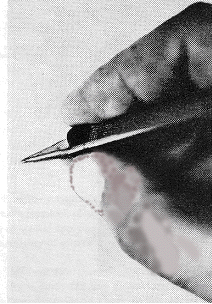
For fine work, such as handwriting or small scale surgery, the grip of the hand used is one I have termed the "external precision grip" (Patkin, 1967) (fig. 2).
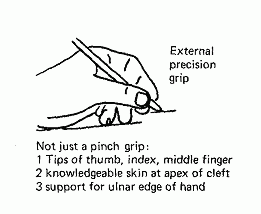
Fig. 2. External precision grip
In orthopaedics this is often referred to as the pinch grip, because
it used the tips of the thumb and index finger for holding instruments,
as well as for picking up small objects. However, such a description is
not adequate for the present purpose, and at least two more components
must be considered. The first is support of the instrument handle by the
knowledgeable patch of skin at the apex of the thumb cleft, on which the
instruments rests, rolls if it is rotated with the fingertips, and which
provides extra feedback information about its position and applied forces.
The other additional component is support for the ulnar edge of the hand,
forearm, and the ring and little fingers, basic to the control of tremor.
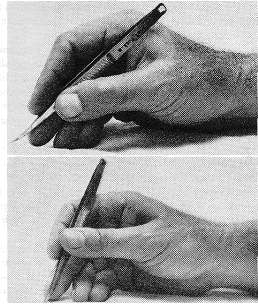
This grip contrasts with the "internal precision grip" of the hand (fig. 3)
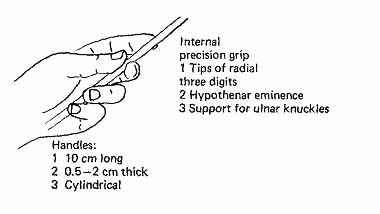
Fig. 3. Internal precision grip
Here the handle of a straight instrument is within the palm of the hand,
and the instrument is used paralled to the work surface rather than at
an angle of about 45 degrees to it.
Within the pinch component of the external precision grip the instrument
must be thick enough not to slip through the pulps as they flatten against
one another (fig. 4), nor must it be so thick that it separates them too widely, when they
lose contact, support, and tactile information from one another.
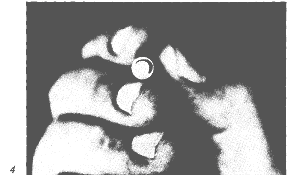
For hands
not used for heavy manual work, a pressure of 50 g flattens the fingertip
skin a distance of 2 10 mm, varying with site. This level of force of
50 g is an important guide to tremor control during fine work and is analysed
in the companion paper on Ergonomics and the Operating Microscope. At
this light pressure the features of the external precision grip of the
hand impose certain requirements on instruments [Patkin, 1969]. These
constraints are a handle long enough to reach from the tips of the semiflexed
fingers to the apex of the thumb cleft, shaped for manipulation within
the fingertips, and a sufficient distance to the tip to reach the working
surface.
Thus design features comprise a length of 10 cm, a cylindrical shape to allow rotation within the fingertips (fig. 5),and a diameter of 5-10 mm for a length of 1 or 2 cm in that region, with a thinner diameter for the other end of the handle so that it does not tra, ;i laterally across the thumb cleft during rotation. The distance to the instrument tip, based on a working angle of 45 degrees and an average finger thickness, should be about 2 cm. This figure is of course completely different for operations deep within cavities, bounded for example by an ear speculum or an operating laryngoscope. The centre of gravity of the instrument should be between the fingertips and the apex of the thumb cleft, while for the finest work, as already noted, the pressure to close the instrument should be about 50 g.
In addition, though most feedback from fine work is visual rather than tactile, it is a help for the tactile feedback to be concentrated in a relatively small area of skin contact, which partly conflicts both the earlier design requirement for broad contact with skin flattening.
For very fine work, it is likely that a modification of the external precision grip will emerge.
In this 'microsurgical grip' (fig. 6a) the instrument is held by the fully supported hand and fingertips, with the hand and forearm supinated about 30 degrees from the usual writing position, the middle finger tip resting on the work surface, and in turn supporting the handle of the instrument which is rotated or rolled by the thumb tip. The rest of the instrument handle lies on the index finger rather than the apex of the thumb cleft. The instrument is now in a paracoronal plane rather than nearly sagittally, and this will influence the posture the operator must adopt in relation to the position of an anastomosis or a suture line to be undertaken, just as a tennis player positions himself for a forehand stroke.
While visual factors are discussed in more detail in the companion paper, two important aspects for instrument design are glare from polished surfaces and the colour of suture material. Glare cuts down visual acuity, on which the microsurgeon relies almost completely for his dissection. Instrument makers have devised several ways of decreasing the glare from instruments of stainless steel, which have traditionally been highly polished to cut down corrosion.
These methods are: (1) Matt finish, in which sandblasting with fine particles roughens the surface mechanically, while still allowing corrosion resistance. (2) 'Satinising', where the highly polished surface is subjected to re polished with a coarser compound. (3) Black chroming, which gives the familiar dull black finish on some instruments from the Richards Manufacturing Company. (4) Blue anodising of tantalum instruments, such as neurosurgical forceps made by Codman.
Colour contrast is important for picking out structures during an operation. Where sutures are translucent or neutral in colour, like wet catgut or 'Fin clear nylon, they are difficult to identify against tissue. For that reason, suture manufacturers are now introducing special dyes for their material. The microsurgeon will generally use a smooth plastic surround drape for his dissection to show up sutures which would otherwise be camouflaged, as well as small plastic backing strips, recommended by O'Brien et al. [1970], yellow behind the arteries and blue behind veins, to make anastomosis easier.
Selection Factors and Standards
As with any purchase, the choice between different equipment suitable for a task depends on factors of availability, quality and working life, price and available funds, and delivery times and after sales service. An additional factor for selection, which also provides useful insights for the work situation, is given by standards, which are worth considering in more detail.
Standards are documents published by a standards association or similar body in most countries, which contain specifications, test methods, and codes of operation for good industrial practice. They are usually drawn up by technical subcommittees, and are based on practical experience rather than representing some kind of ideal to be aimed at.
Though little known to surgeons, in most industrial countries there are standards published for a wide range of surgical instruments, describing the stainless steel to be used, recommended shapes and dimensions, and several performance tests. It is these performance tests which are worth closer study.
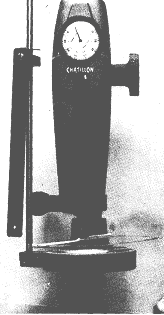
It is still too early for official standards for microsurgical instruments. but as indicated earlier, for the finest work using erg_micr_instrum.htm0 or erg_micr_instrum.htm0 sutures the closing pressure exerted by the fingertips should be about 50 g. This is checked easily with a postal scale, and perhaps more convincingly with sophisticated equipment such as a motorised Chatillon testing gauge (fig.7).
So far, the standards described have related to the man machine interface rather than the machine tissue interface, which will now be discussedbriefly. The spacing and shape of jaw serrations can be specified and checked.One can view the imprint of the serrations on lens cleaning tissue and seethat the pattern is clear and free of tears. When the jaws are being closedthe tips should be seen to meet first and should not gape when full closurehas occurred. (Failure here is what causes mosquito forceps to fall off tissueedges such as hernial sacs.) While such microsurgical standards are yet to bedeveloped, at least two manufacturers have studied the closing pressure required for microvascular clamps. In the past such clamps have been toostiff, causing internal damage and thrombosis. Obviously if too slack theywill slip off and also fail to occlude, but a closing pressure of greater than10 30 g, depending on the particular blood vessel, is now taken to be excessive.
Some manufacturers of first grade equipment will object to standards as an added unnecessary burden, especially the kind of detail found in government purchasing contracts. Certainly the aim should not be one of compulsion, but rather of a means of communicating about instruments using numbers as well as adjectives, with the aim of better handiwork. Quite likely a single standard range will be inadequate to cover the preferences of surgeons and in addition to special need, it may prove worthwhile having three ranges, a central popular range, an extra stiff range with twice the standard pressures, and an extra slack range with normal figures halved.
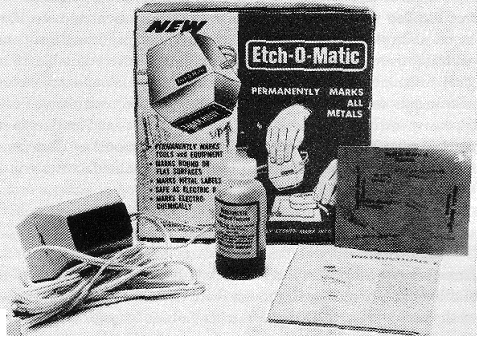
In a large and partly anonymous organisation such as a major hospital, instrument acquisition should be a systematic process, with instruments checked against invoices on arrival, and submitted for approval before acceptance, either by a member of the surgical staff or a senior theatre sister with special interest in this area. Leaving aside the technical data and familiarisation needed for more complicated equipment, the last step in acquisition should be adequate marking of instruments with the name of the department and the month and year of acquisition. Rather than mechanical engravers, the most satisfactory method of marking is with the electro-etching devices provided by several instrument makers such as the Richards Manufacturing Company (fig. 8)
The Care of Surgical Instruments
With growing interest in this subject, a number of papers on this subject are now available [PATKIN, 1975, 19761, together with booklets from surgical instrument companies. Care of instruments requires a deliberate policy, including allotment of staff and facilities for this purpose in a major hospital, as well as establishing connections with commercial servicing organisations where these are available.
In considering instrument care it is useful to understand the nature
of stainless steel. No steel is completely resistant to corrosion. In
so called stainless steel, protection against rusting is due to a continuous
film of chromium oxide. This is achieved by a process called passivation
which consists of dipping the instrument in nitric acid to remove the
surface iron atoms. When exposure to air occurs the remaining chromium
atoms immediately oxidise to form a continuous film of chromium oxide
now impervious to oxygen and protecting the iron underneath so that rusting
can no longer
occur. However, the surface 'passive' layer can be broken by scratching
and by chemical attack, particularly by electrolytes such as salt solution
acting for several hours. For this reason, instruments should be rinsed
in mineral free distilled water during the course of an operation, and
scrubbed free of blood and other tissue fluids at the end of surgery using
a soft brush and neutral rather than alkaline soap. A toothbrush is very
suitable for microsurgical instruments. An ultrasonic cleaner is useful
and labour saving for instruments in general surgery, if unlikely to be
used daily. For fine and expensive instruments, cleaning of the tiny crevices
and recesses is effectively carried out after each operation with a dental
model of ultrasonic cleaner holding less than half a litre of liquid.
The manufacturer's instructions should be studied and followed.
An experienced technician can carry this out by hand, or by gently hammering the instrument on a block of hardwood or soft metal until jaws and handles are realigned, though there is a risk of making the two sets of teeth lose contact so that the ratchet fails to engage. The springiness of dissecting forceps can be adjusted by careful bending, by grinding away some of the metal near the butt to decrease the handle thickness and stiffness, or by specialised heat treatment. Ophthalmic needleholders are fairly easy to adjust by bending the handles, but a mistake in carrying out this manoeuvre is liable to be quite expensive.
The sharpening of single bladed instruments such as solid scalpels and osteotomes is best carried out by a trained craftsman, though valuable guidelines are provided in an excellent booklet published by the Richards Manufacturing Company. The sharpness of cataract knives can be checked by gently piercing chamois leather stretched over a little drum available from several instrument companies, and noting if there is any resistance or catch, or by shaving a very thin layer of skin off the ball of the thumb.
The sharpness of scissors can be checked objectively by a test described in the relevant British Standard [19641. A single layer of gauze is placed between the blades, for about two thirds of their length, and the blades closed without applying any lateral pressure to them, by having one blade resting on a table and the handle pressed downwards evenly and continuously. The result should be a clean cut confirming what one probably knows already from using the instrument during surgery. Such tests provide a simple way of weeding out defective instruments before they are presented for use at operation.
The sharpening of scissors is a specialised skill best carried out by a properly trained instrument mechanic. It requires that the blades be separated so that the hollowed area can be re ground from the tip, past the screw joint, to a raised area called the 'shoulder', 'moon', or 'rise' depending on the particular instrument maker describing the anatomy of scissors. Only after hollow grinding is the edge itself then sharpened. Difficulty in servicing instruments properly has helped encourage the manufacture of more durable instruments, but there remains a responsibility for surgeons to set an example in good instrument care and in fostering the development of instrument maintenance services in hospital.
British Standards institution. Specification for Mayo's Operating Scissors.
British Standard 3793:1964 (1964).
O'Brien, B. MCC.; Henderson, P. N.; Bennett, R. C., and CROCK, G. W.:
Microvascular surgical technique. Med. J. Aust. i: 722 725 (1970).
Patkin, M.: Ergonomic aspects of surgical dexterity, Med. J. Aust. ii;
75 5 75 7 (1967). Patkin, M.: Ergonomic design of a needleholder. Med.
J. Aust. ii: 490 493 (1969).
Patkin, M.: Guidelines for the selection and care of surgical instruments.
Bulletin, Hospitals Department, South Australia, No. 10, special supplement,
March (1975).
Patkin, M.: Everything you ever wanted to know about surgical instruments
but were afraid to ask. Gown and Gloves 1: 2, 3, 4; 2: 1 (Davis &
Geck, 1975).
-o0o-
Contents
Design factors
Microsurgical needs
Hand grip and handle design
Selection factors and standards
Acquisition of instruments
The care of surgical instruments
Adjusting forceps
Sharpening
References
Adv. Ophthal., vol. 37, pp. 23 33 (Karger, Basel 1978)
Selection and Care of Microsurgical Instruments
Michael Patkin, FRCS, FRACS, Ergon House, 92A Wood Terrace, Whyalla 5600, (South Australia)